11 Organizing Data
There is a famous book by one of the pioneers of computer science, Algorithms + Data Structures = Programs. This title reflects the idea that there are two fundamental elements of program design:
- the series of steps and decisions (algorithm) that the program will execute
- the organization and storage of data (data structures)
We discussed the first issue in Chapters 5 and 6; this chapter deals with the second.
We have already covered some MATLAB data structures - arrays (numerical, character, and string). Those arrays were limited to a single data type - either integer, floating point, character, or string. For more complex data analysis it is often useful to combine numerical and text information in the same structure. This chapter introduces three MATLAB data structures (cell arrays, structs and struct arrays, and tables) that enable diverse data types to be stored together.
11.1 Cell Arrays
MATLAB provides a general-purpose container for arbitrary data objects called a cell. [1] An analogy to illustrate the difference between an ordinary numerical (or text) array and a cell array is a compartment storage box. A numerical array is like a fixed-compartment box, in which each compartment is the same size. If one compartment contains a floating-point number, they ALL have to contain floating point numbers.
A cell array is like an adjustable-compartment box, in which the compartments can be adjusted to different sizes. So one compartment may contain a floating-point number, another may contain a string, a third may contain a character array, and a fourth may contain a vector or matrix of numbers - a cell array can contain other arrays! As an initial example, suppose it is desired to store the following information in a single data structure:
- a student's name as a character array
- the student's GPA as a floating-point number
- the student's home address as a string
- the student's test scores in a certain course as a vector of integers
This is illustrated in the figure below for one case:
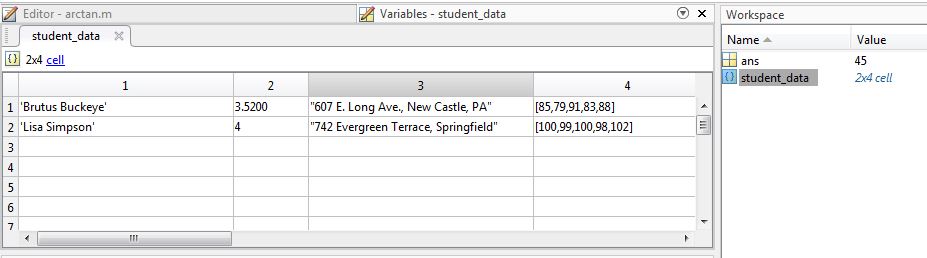
Table 11.1: student_data cell array
| Index | Contents |
| 1 | 'Brutus Buckeye' |
| 2 | 3.85 |
| 3 | "607 E. Long Ave, New Castle, PA" |
| 4 | [85, 79, 91, 83, 88] |
MATLAB code to create this cell array is as follows:
student_data {1} = 'Brutus Buckeye';
student_data {2} = 3.52;
student_data {3} = "607 E. Long Ave., New Castle, PA";
student_data {4} = [85, 79, 91, 83, 88];
The only syntactic difference between these assignment statements and what we have seen previously is the use of { } instead of ( ) for indexing. This is what specifies that the array is a cell array rather than a numerical, character or string array.
A cell array can be 2-dimensional (or higher) just like a numerical or text array. To continue the previous example, information for a second student could be stored in the second row of the cell array:
student_data {2, 1} = 'Lisa Simpson';
student_data {2, 2} = 4.0;
student_data {2, 3} = "742 Evergreen Terrace, Springfield";
student_data {2, 4} = [100, 99, 100, 98, 102];
student3 = {'Bart Simpson', 1.02, "742 Evergreen Terrace, Springfield", [0, 3, 2, 0, 1]}>> student_data = [student_data; student3]
student_data =
3×4 cell array
{'Brutus Buckeye'} {[3.5200]} {["607 E. Long Ave., New Castle,…"]} {1×5 double}
{'Lisa Simpson' } {[ 4]} {["742 Evergreen Terrace, Spring…"]} {1×5 double}
{'Bart Simpson' } {[1.0200]} {["742 Evergreen Terrace, Spring…"]} {1×5 double}
Extracting Information from a Cell Array
Extracting information from a cell array is similar to a numerical array, except that curly braces { } are used instead of parentheses. Here are some examples of extracting information from the cell array created above:
%Get the name of the first student
>> student_data{1, 1}
ans =
'Brutus Buckeye'
%Get all data for the first student
>> student_data{1, :}
ans =
'Brutus Buckeye'
ans =
3.5200
ans =
"607 E. Long Ave., New Castle, PA"
ans =
85 79 91 83 88
%Get all student names
>> student_data{:, 1}
ans =
'Brutus Buckeye'
ans =
'Lisa Simpson'
ans =
'Bart Simpson'
%Loop over all students, printing out some of their information
>> for k = 1:size(student_data, 1)
fprintf('%s lives at %s and has a GPA of %.2f\n', student_data{k, [1,3,2]})
end
Brutus Buckeye lives at 607 E. Long Ave., New Castle, PA and has a GPA of 3.52
Lisa Simpson lives at 742 Evergreen Terrace, Springfield and has a GPA of 4.00
Bart Simpson lives at 742 Evergreen Terrace, Springfield and has a GPA of 1.02
When a cell contains an array, it is possible to perform a kind of "double indexing" to extract the contents of the cell and extract an element of that array in one step, for example:
>> %extract Lisa Simpson's score on exam 3
>> student_data{2, 4} (3)
ans =
100
The first index {2, 4} extracts the contents of row 2, column 4 of the cell array, which is the vector [100, 99, 100, 98, 102]. The second index (3) extracts the third element from this array, which is 100.
The most common mistake when extracting information from a cell array is to use parentheses instead of curly braces. this can be a difficult error to debug, because it is valid MATLAB syntax; it just doesn't do what was intended. The following examples shows the difference between extracting information from a cell using { } and simply copying the cell using ( ).
>> %extract information from the cell
>> name1 = student_data {1, 1}
name1 =
'Brutus Buckeye'
>> %make a copy of the cell
>> name_copy = student_data (1, 1)
name_copy =
1×1 cell array
{'Brutus Buckeye'}
>> %extract the last name from the char array
>> name1 (8:end)
ans =
'Buckeye'
>> %try the same with the copy, but it doesn't work
>> name_copy (8:end)
ans =
1×0 empty cell array
>>
In the first case, the contents of the cell were extracted using { }, so name1 is a character array, and it is possible to index into that array to extract the last name. In the second case, a copy of the cell was made using ( ), so name_copy is still a cell (i.e. a 1x1 cell array). Therefore it is not possible to index into it to extract a portion of the name.
Lecture Videos 11.1-2 - Cell Arrays
Checkpoints
11.1.1 Cell Arrays in Graphical Input / Output
A later chapter will cover graphical user interface (GUI) programming in detail, but this section introduces two simple features to add interactivity to a MATLAB programming, the input dialog box and the output message box. Cell arrays play a role in both.
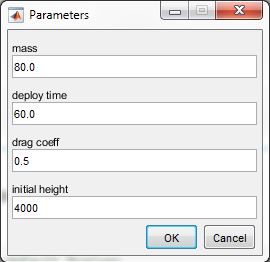
The following example shows how to create an input dialog box using the inputdlg() function to allow the user to enter parameters for a simulation. The input arguments to the function are:
- a cell array containing the names of the entry fields
- the title of the dialog box ('Parameters' in this example)
- the size of each entry field (in this example, each field is 1 row high and 40 characters wide)
- a cell array containing default values for each entry field; important: these are TEXT values, not numerical
%Open dialog box; provide variable names, box title, size, and default values
params = inputdlg({'mass', 'deploy time', 'drag coeff', 'initial height'}, 'Parameters' , [1,40], {'80.0', '60.0' , '0.5', '4000'})
%Convert the strings to numbers for use in calculations
paramVals = str2double(params)
When the inputdlg() function executes, the window shown below opens. The user can change the values in the entry fields as desired, then click OK. The function returns a cell array containing the entered values; important: these are TEXT values, not numerical. They can be converted to an array of numerical values using the str2double() function, as shown in the code example.
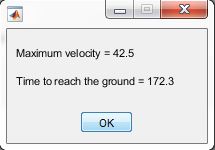
To display results more interactively than with command line output, the msgbox() function can be used. An example is shown below. The input to msgbox() is a cell array containing the strings (or character arrays) to be displayed. If the string contains formatted numbers, a convenient way to create it is with sprintf(), which is essentially the same as fprintf(), except that it stores the string in a variable instead of printing it to the command window.
vmax = 42.5;
tland = 172.3;
%sprintf works similarly to fprintf, but it stores the result to a string
%instead of printing it out
message1 = sprintf('Maximum velocity = %.1f\n', vmax)
message2 = sprintf('Time to reach the ground = %.1f\n', tland)
msgbox({message1, message2})
When the msgbox() function executes, the following window will open; it closes when the user clicks OK.
Lecture Video 11.3 - Graphical Input & Output
Checkpoint
Lecture Video 11.4 - Cell Array Example
11.2 Structs and Struct Arrays
Lecture Video 11.5 - Intro to structs
11.2.1 Creating a struct
While a cell array is a convenient way to combine disparate data in a single structure, it is somewhat unstructured - the only way to access the entries is by number, which opens the door to a lot of bugs. In the example of the last section, if you type student_data(1, 1) when you mean student_data(1, 3) it may take much effort to find that error.
A struct is a more formal data structure that allows data elements to be accessed by name instead of number. MATLAB code to create a struct to store Brutus's information from the previous section would be:
>> student.Name = 'Brutus Buckeye';>> student.GPA = 3.52;>> student.Address = "607 E. Long Ave., New Castle, PA";>> student.Scores = [85, 79, 91, 83, 88]student = struct with fields: Name: 'Brutus Buckeye' GPA: 3.5200 Address: "607 E. Long Ave., New Castle, PA" Scores: [85 79 91 83 88]
Some important points about this example are:
- In lieu of indexing, each element (or field) of the struct has a name.
- The syntax to assign a value to a field is
struct_name.field_name = value. In this example, studentis the name of the struct, whileName, GPA, Address, andScoresare the field names. - By convention, field names are capitalized; this is not a strict requirement.
- This is a single struct; it is not yet an array.
This example created the struct one field at a time. It is also possible to create an entire struct in one line using the struct() function:
>> student2 = struct ('Name', 'Lisa Simpson', 'Address', "742 Evergreen Terrace, Springfield", 'GPA', 4.0, 'Scores', [100, 99, 100, 98, 102])
student2 =
struct with fields:
Name: 'Lisa Simpson'
Address: "742 Evergreen Terrace, Springfield"
GPA: 4
Scores: [100 99 100 98 102]
The inputs to the struct function are the names of the field in ' ', each one followed by its value.
Lecture Video 11.6 - Creating a struct
Multiple structs can be appended into a struct array, provided that they have the same set of field names:[2]
>> student_data_struct = [student, student2]
student_data_struct =
1×2 struct array with fields:
Name
GPA
Address
Scores
Elements can be added to the struct array using indexing:
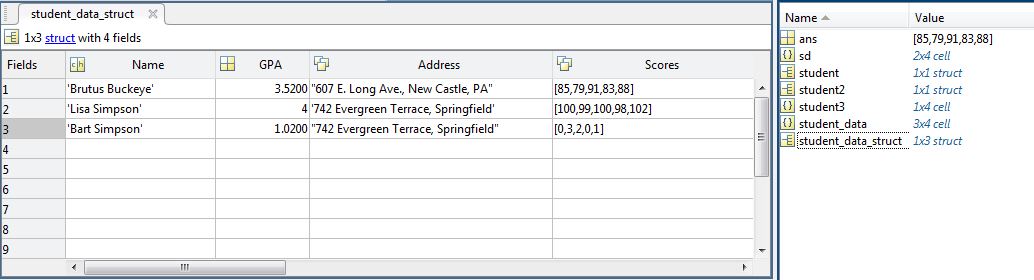
>> student_data_struct (3) = struct ('Name', 'Bart Simpson', 'GPA', 1.02, 'Address', "742 Evergreen Terrace, Springfield", 'Scores', [0, 3, 2, 0, 1])
student_data_struct =
1×3 struct array with fields:
Name
GPA
Address
Scores
Notice that when a struct array is displayed to the command window, only the names of the fields are shown, not their values. The full contents of the struct can be examined in the workspace:
As an alternative to the step-by-step approach, the entire struct array can be created in one step using the struct() function as follows:
student_data_struct = struct ('Name', {'Brutus Buckeye', 'Lisa Simpson', 'Bart Simpson'}, 'GPA', {3.5, 4, 1.02},...
'Address', {"607 E. Long Ave., New Castle, PA", "742 Evergreen Terrace, Springfield", "742 Evergreen Terrace, Springfield"},...
'Scores', {[85, 79, 91, 83, 88], [100, 99, 100, 98, 102], [0,3,2,0,1]});
In this syntax, the set of values for each field is given as a cell array.
11.2.2 Extracting and Modifying Struct Information
Extracting information from a single struct is not much different than reading the value of a scalar variable - just append a dot and the field name to the struct name; for example,
>> name1 = student.Name
name1 =
'Brutus Buckeye'
Extracting information from a struct array is a little trickier; the key is getting the pieces of the syntax in the right order - it is struct_name(index).FieldName; for example,
>> Lisas_GPA = student_data_struct(2).GPA
Lisas_GPA =
4
Modifying the contents of a struct field uses the same syntax, except of course that it is left of the equals sign:
>> student_data_struct(3).GPA = 1.1; %Bart got a C!
The following example shows how data is stored in and extracted from a struct array. The original struct array contains subjects' names, heights, weights, and gender. The height/weight information is extracted to calculate each person's body mass index and determine their weight classification, which are stored as new fields in the same struct array.
Lecture Videos 11.7-8 - struct Arrays
Checkpoints
11.2.3 Nested Structs
The examples up to this point have been relatively simple, but struct arrays can implement much more complex data structures. In fact, a field of a struct can be another struct or struct array, which enables arbitrarily complex tree structures. An example is illustrated below. The struct array called students contains a struct for each student; each of those structs has the following fields: Name, Major, ID, GPA, and Courses. The courses field is itself a struct array, which contains a struct for each course - each of those structs contains the fields Title, Credits, and TestScores.
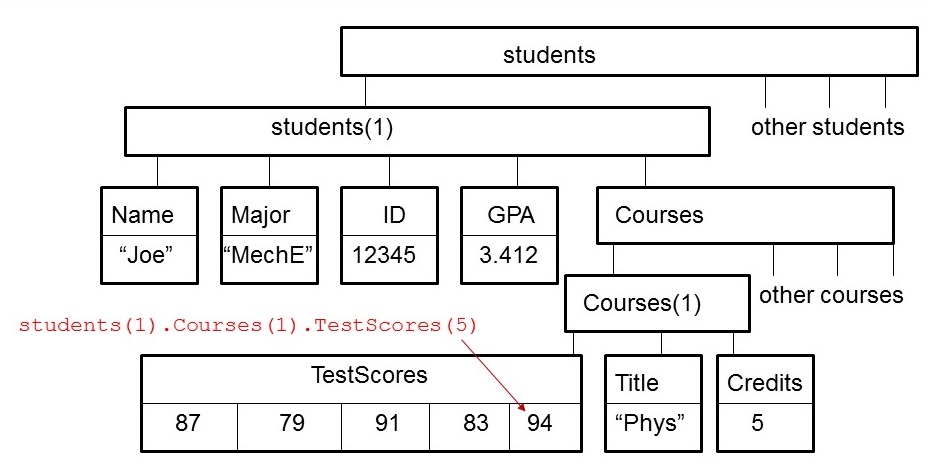
To access information deep within a nested struct array may require multiple indices and multiple dots, as shown in the diagram.
MATLAB code to create this struct array is shown below. A variety of techniques to add information to the array are illustrated - all are valid; use whichever technique is most convenient in a given circumstance.
Checkpoint
11.3 Tables
A table is a data structure that is suitable for storing and displaying regular, column-oriented data. It is often used to store data that is imported from a text or spreadsheet file. A table can be constructed from existing vectors, provided that each vector has the same length. The following example repeats the BMI calculation of the previous section, but with the data stored in a table instead of a struct array. Initially the various data fields (names, heights, weights, MorF) are stored in separate column vectors; they are then collected into a table. Notice that by default each column of the table is named the same as the original vector.
Notice that the syntax to extract a value from a table is similar to a struct array, but the order is reversed: the column name comes first, then the index. Within the loop, as each BMI and classification value is determined, they are stored in separate column vectors. These columns are added to the table after the loop is complete. Adding columns to a table requires the use of the function addvars() as shown. Notice that to determine the number of rows in the table, the height() function is used; length() does NOT apply to tables. (size() could also be used.)
Individual elements of a table can be extracted or modified. Suppose that Julia loses 20 pounds; the table would be updated as follows:
>> data_table.weights(8) = data_table.weights(8) - 20
>> data_table.BMI(8) = 703*data_table.weights(8)/data_table.heights(8)^2
>> data_table.classification(8) = "Overweight"
data_table =
8×6 table
names heights weights MorF BMI classification
_______ _______ _______ ____ ______ ______________
"Jim" 70 210 M 30.129 "Obese"
"Joe" 72 178 M 24.139 "Normal"
"John" 68 182 M 27.67 "Overweight"
"Jeff" 65 105 M 17.471 "Underweight"
"Jack" 66 142 M 22.917 "Normal"
"Jill" 64 121 F 20.767 "Normal"
"Jane" 68 152 F 23.109 "Normal"
"Julia" 62 152 F 27.798 "Overweight"
11.3.1 Reading and Writing Tables
A table can be read into MATLAB directly from a text or Excel file using readtable() or written to a text or Excel file using writetable(). There are many options that can be specified, but the simplest variation requires only the name of the table and the filename, as follows:
writetable(data_table, 'BMItable.txt')
or
writetable(data_table, 'BMItable.xlsx')
MATLAB determines whether to create a text or Excel file based on the file extension.
These files can be read back into a table using:
dt = readtable('BMItable.txt');
or
>> dt = readtable('BMItable.xlsx')
dt =
8×6 table
names heights weights MorF BMI classification
_________ _______ _______ _____ ______ _______________
{'Jim' } 70 210 {'M'} 30.129 {'Obese' }
{'Joe' } 72 178 {'M'} 24.139 {'Normal' }
{'John' } 68 182 {'M'} 27.67 {'Overweight' }
{'Jeff' } 65 105 {'M'} 17.471 {'Underweight'}
{'Jack' } 66 142 {'M'} 22.917 {'Normal' }
{'Jill' } 64 121 {'F'} 20.767 {'Normal' }
{'Jane' } 68 152 {'F'} 23.109 {'Normal' }
{'Julia'} 62 172 {'F'} 31.456 {'Obese' }
Notice an important difference between the original data table and the reconstructed one after it was written to and read from a file: the text columns are now cell arrays. Consequently, curly braces must be used for indexing to extract those values from the table, e.g.
>> fprintf('%s''s BMI is %.1f, so he is %s\n', dt.names{2}, dt.BMI(2), dt.classification{2})
Joe's BMI is 24.1, so he is Normal
>>
See the Mathworks documentation for more details, such as reading or writing a specified sheet of an Excel file.
11.4 Mathworks Resources
For more details about built-in functions to perform operations on cell arrays, structs and tables, see these Mathworks web pages:
Creating and Working with Tables.
11.5 Problems
- Summarizing a Grocery List
-
- Multiple occurrences of the same item will always be consecutive
- The plural of all items can be generated by adding an 's'
voter, which contains voters' selections in a ranked-choice voting scheme. In this system, each voter may indicate up to their first 5 preferences; however, some voters may choose not to use all of their preferences.candidates, which contains the names of the candidates, is also provided.-
- The name of the candidate
- The number of first-place-votes for that candidate
- The number of second-place votes for that candidate
- and so forth.
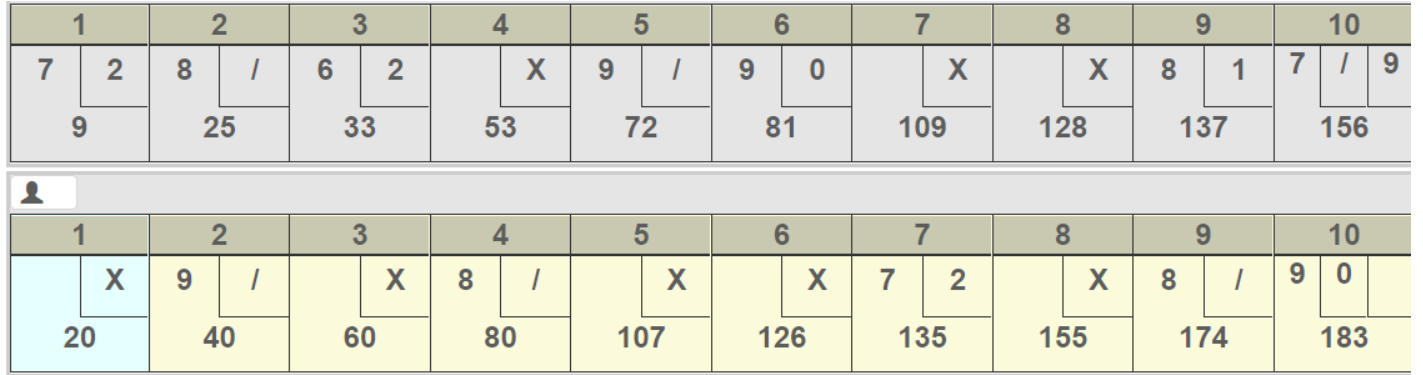
{ 'Toney', 237, 118, 75, 102 }card_deck = card_deck(randperm(52));player_hand and dealer_hand. Initialize them to be empty cell arrays using { }. -
- copy the contents of the top cell of the
card_deckcell array (hint: use theendkeyword) to be the next card in theplayer_handarray (hint: useend+1) - delete the last element from
card_deck(IMPORTANT: To DELETE an element from a cell array, use ( ), NOT { }. Once again, use theendkeyword)
- copy the contents of the top cell of the
dealer_hand.-
- Value, which is 'A' for Ace, '2' for Two, ... 'J' for Jack etc.;
- Suit, which is 'H' for Hearts, 'D' for Diamonds, etc.
b) Calculate the player's score and the dealer's score using the following simplified blackjack scoring:
- Take advantage of the ASCII codes of the numbers 2 through 9 to reduce the number of separate cases that you have to consider.
- Make a local function to calculate the score, so that you don't have to duplicate the code for the player and dealer.
- Trying to use logical indexing & element-wise array operations would be very tricky in this problem, given its combination of cell arrays and structs. Unless you want to challenge yourself to devise an extremely efficient solution, USE A LOOP to calculate the total score.
Find an error? Have a suggestion for improvement? Please submit this survey.
