Skill Group: Biosafety and Biosecurity
Doffing (taking off) of PPE
Before You Start …
Before you work on this lesson, you should have a strong working knowledge of lessons 1 -3 in this module; in particular, you should know and be able to explain:
- The purposes of PPE use;
- The routes for pathogen transmission;
- Relative period of times pathogens can survive in the environment and how the type of pathogen (i.e., bacteria, virus, fungi) influences this;
- Commonly encountered PPE in clinical veterinary practice, what it protects, and when it is indicated in clinical situations.
- The suggested order of, and common errors in, donning PPE;
- Locations where PPE donning should occur.
You have previously learned about how to select appropriate PPE items given an anticipated pathogen transmission risk and how to don these items. Now, we will discuss effective PPE doffing.
Introduction
Doffing PPE is perhaps the most difficult component to effective PPE use and where most novice leaners make mistakes. This is due to a number of factors, including:
- The high level of attention to detail required;
- Pathogen contamination may not be visible and errors may go unnoticed;
- Facilities (e.g., isolation area) may be cramped or otherwise difficult to maneuver within;
- Limited practice.
However, mastering PPE doffing is critical to ensure the safety of your patients, staff, clients and yourself. In this lesson, we will give you the background and step-by-step instructions to ensure success in this important skill.
Learning Outcomes
By the end of this lesson, you should be able to:
- Identify key elements of effective PPE doffing.
- Demonstrate the correct order of effective PPE doffing.
- Describe common errors in doffing PPE.
General Principles of Doffing PPE
It is important to realize that the order and specifics of doffing PPE may vary with the level of protection, type of PPE used and configuration of the isolation unit. You will encounter different protocols in different practices and even services within a facility. For teaching and examination purposes, the protocols that are taught in this training are what is expected for assessments related to this learning unit. Outside of a student assessment here at The Ohio State University, you should follow the specific protocols for each service and hospital in which you work. In all situations, the goal remains the same: to remove all PPE items without contaminating yourself or the environment, thereby limiting the chance of pathogen transmission to patients, staff and clients.
Before we get started, there are a few important general principles to keep in mind when doffing PPE:
- It is critical to think in terms of “clean” and ‘”dirty.” PPE and environmental surfaces that are considered “clean” (e.g. surfaces of PPE in contact with your skin, environmental surfaces in the anteroom) should never touch PPE and environmental surfaces that are considered ‘dirty’ (e.g. surfaces of PPE that has the potential to be in contact with the contaminated environment or patient, environmental surfaces in the isolation unit where the animal is housed). As examples:
- When doffing PPE items such as gowns and gloves, roll these items off so that the dirty surface is contained on the inside of the ball
- When moving from a dirty to clean area, ensure you lift one foot, remove the contaminated shoe cover and stepping down in the clean area (then do the same with the opposite foot).
- Anytime there is a risk that your hands have been contaminated, hand hygiene (washing with soap and water or using an alcohol-based hand sanitizer) should occur. This includes immediately after:
- Removing gloves;
- Removing eye and face protection when gloves have already been removed;
- PPE doffing is complete;
- Leaving the anteroom.
Where and when to doff PPE
PPE should be doffed immediately after patient contact as you exit the contaminated area, leaving all potentially contaminated items within the isolated (contaminated) environment. It is important doffing occurs in a safe location away from the patient. Often this is in an area adjacent to the anteroom.
The correct order of PPE doffing
Remember, in this training we are using what is likely the highest level of protection typically encountered in clinical veterinary practice. We are wearing zip-up disposable coveralls, with hood, disposable gloves, eye protection, nose and mouth protection, and disposable footwear. If you can appropriately doff this level of PPE, you can easily adapt the protocol to correctly use lower levels of protection.
The order of doffing PPE is very important to ensure that you do not contaminate yourself or the surrounding environment. When removing these items, be sure to do so in the following order. If, given the scenario, an item was not worn simply skip that item in the instructions below and proceed the next item.
Video: PPE Doffing
(Watch from 05:33 to end)
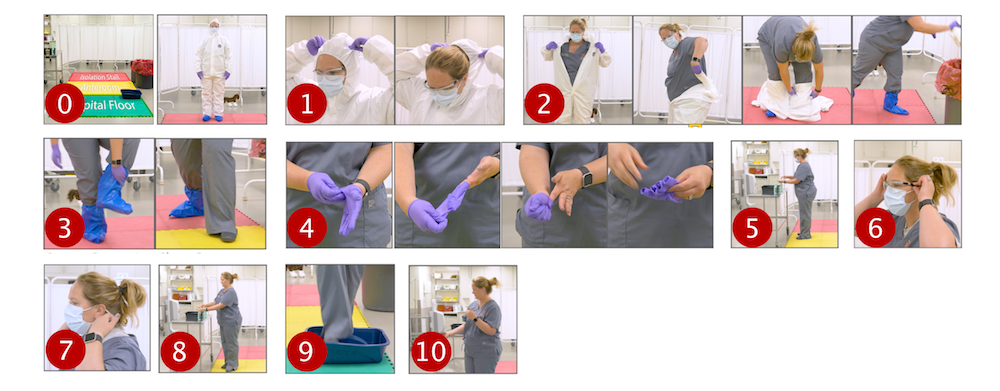
Remove the coveralls
- Wearing gloves, first pull the hood off your head by grasping the outside of the hood toward the back, so that you do not contaminate yourself or parts of the hood.
- Unzip the coveralls. Remember that your gloves are likely contaminated, so contact only the outside of the coveralls and as little of them as possible. This is most easily achieved by reaching underneath the flap to unzip. Peel the coveralls from the shoulders and arms by pulling on the outer chest surface of the coveralls with your gloved hands. Allow the sleeves to roll inside-out as they come off of your forearms. Pull the sleeves all of the way off so that your gloved hands are free. Pealing down the rest of the coveralls, flipping it inside out, stepping out, balling it up, and disposing of it immediately in the biohazardous waste.
Key point: Removing this type of coveralls from your legs can be challenging (e.g., balance, room to maneuver) so plan ahead. Using a stool or handrail dedicated for this purpose can help. Remember, items should be designated as clear or dirty and this designation needs to be understood by all who use the unit. Whatever you touch with contaminated items, such as gloves and coveralls, should not come in contact with ungloved hands or your clothing.
Alternatives in clinical practice: Disposable tie-around gowns are frequently used as part of PPE in small animal practice. The preferred method for doffing a disposable tie-around gown is to break the ties at the neck by pulling on the upper front portion of the gown with gloved hands, and balling or rolling in the contaminated surfaces. If the gloves are no longer needed (e.g., goggles or mask were not worn, shoe covers not worn or already removed), the gloves can be pulled off inside-out as the hands are withdrawn from the gown’s sleeves.
Remove your shoe covers
- Touching only the outside surface of the disposable shoe cover with your gloved hands, remove one shoe cover, step into the clean area or anteroom with the uncovered foot.
- Follow the same process for the second shoe cover.
- Place the removed shoe covers into a biohazardous waste bin.
Key point: Do not step with your contaminated shoe covers in the clean area, nor allow your uncovered foot to contact a designated dirty area.
Remove your gloves
- Pinch the outside of one glove with your other gloved hand near the wrist (do not touch your skin or clothes with your gloved hand). Pull the glove off your hand so it turns inside out to avoid contamination.
- Hold the removed glove balled up in your gloved hand.
- Slip your ungloved finger(s) inside the second glove and push it off from the inside, turning it inside-out in the process so that the first glove is inside of the second. Do not touch the outside of the glove with your bare hands.
- Discard both gloves into the biohazardous waste bin.
- Immediately perform hand hygiene (wash hands with soap and water or use an alcohol-based hand sanitizer).
Key point: Since it is common for people to inadvertently contaminate their hands during glove removal, or for small glove defects to be present leading to contamination, it is important to immediately perform hand hygiene (washing hands with soap and water or using an alcohol-based hand sanitizer) after glove removal.
Remove the goggles and mask
- Grasp the “clean” areas of the goggles (where the goggles were previously covered by the hood) and carefully remove.
- If being reused, place them in the disinfectant bin so they can be cleaned and disinfected. Otherwise, place in the biohazardous waste bin.
- Grasp the clean parts of the facemask (where the facemask was previously covered by the hood) and carefully remove.
- If being reused, place in the disinfectant bin so they can be cleaned and disinfected. Otherwise, place in the biohazardous waste bin.
- Immediately perform hand hygiene (wash hands with soap and water or use an alcohol-based hand sanitizer) as hands may have become contaminated when touching the goggles and mask.
Leaving the anteroom
- Step into the footbath to assist in removing and killing any pathogens from the bottom of your footwear that may be present.
- Perform hand hygiene (wash hands with soap and water or use an alcohol-based hand sanitizer) as you leave the area.
You have successfully exited an isolation unit, appropriately doffing PPE!
Wrapping Up
In this lesson, you learned about effective PPE doffing.
Before Moving On …
For your continued reference, we have created a “Doffing of PPE” poster that you can download and review as needed.
Use the self-check activity below to practice identifying some common errors with PPE donning.
Finally, practice doffing if you have access to PPE, such as in the CVM Skills Lab!
- Working with a partner, take turns to watch and record your partner doff PPE. Use this checklist to ensure you follow all PPE doffing recommendations
- Video tape yourself doffing PPE (verbalizing what you are doing) and review with a peer to self-assess.
- Glo-germ for self-assessment. Using the Glo-germ kit, simulate pathogen contamination on your PPE. Be sure to follow these steps:
- Apply the Glo-germ to part of the PPE (you can do this as full PPE doffing or only focus on one area, such as doffing contaminated gloves);
- Ensure you can see the Glo-germ ‘contamination’ using the UV flashlight;
- Completely doff the PPE;
- Give yourself a careful scan with the UV light to ensure you did not contaminate your skin or clothing.
- After watching videos of you and your partner doffing PPE, reflect on what went well and what you need to improve. What specifically do you need to improve and how can you make these changes?