Skill Group: Dermatology
Goal Two: Skin and Ear Cytology
Before You Start …
Please refer to individual techniques for the equipment needed.
Introduction
Skin surface and ear cytology is the most frequently used dermatologic diagnostic technique in practice. Its’ purpose is to help you identify bacterial or fungal organisms (yeast) and to assess the infiltrating cell types, neoplastic cells or acantholytic keratinocytes. Ear cytology is used to identify the aforementioned list of organisms and to identify otic parasites. Collection of samples for cytology should be performed on nearly all patients with skin or ear disease. It is a quick, high yield, and inexpensive procedure. It is not only used to make a diagnosis but also used to monitor response to therapy and prevent premature cessation of therapy and can guide decisions about culture submission.
Learning Outcomes
By the end of this lesson, you should be able to:
- Collect cytology from the skin and ears and know what equipment is needed for each technique.
- Skin Cytology Collection:
- Identify clinical lesions that would indicate skin cytology should be performed.
- Describe how to collect skin cytology using a #10 blade, a spatula and tape preparation.
- Describe the significance of the findings on the slide.
- Explain advantages and disadvantages of the three skin cytology techniques: scraping of the surface debris from the skin, impression smear and tape preparation.
- Ear Cytology Collection:
- Explain the utility of otic cytology.
- Describe and perform the collection techniques for obtaining a sample for otic cytology for evaluation of organisms and aural mites.
- Describe the method of preparation of an otic cytology sample for microscopic viewing.
- Identify findings on normal and abnormal otic cytology preparations.
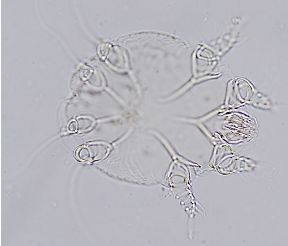
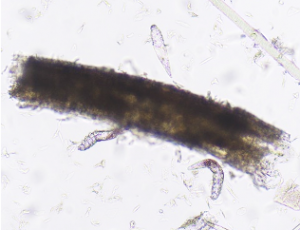
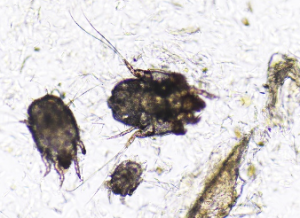
- Identify aural mites (Otodectes cynotis, Demodex, Notoedres cati).
Skin Cytology Collection
Cytology from the skin can be collected by direct or tape techniques.
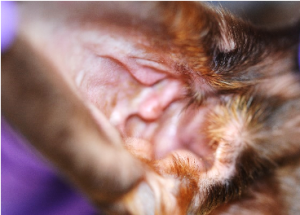
Clinical lesions that should be considered as excellent sites for sampling include but are not limited to the following: pustules, papules, vesicles, bulla, erythema, alopecia, crusts, waxy scale, hyperpigmentation, lichenification, keratosebaceous debris, draining tracts, erosions and ulcerations.
Direct Techniques
For the direct techniques, material can be collected from the surface of the skin with the following methods:
- Scraping the surface debris from the skin and smearing the material onto the center of a dry slide like “buttering bread” – scrapings are superficial (do not draw blood) and no oil is used in their collection.
- Impression smear: directly pressing the slide on the skin several times in regions that have moist exudate such as pustules, draining tracts, erosions or ulcers, i.e., fluid containing lesions.
- Collection of aural exudate and smearing the aural exudate from each ear on the dry slide in separate locations correlating with right and left ears, respectively; can involve oil in the collection if looking for aural parasites.
- Fine needle aspirate: needle used to gather aspirated material from a mass, nodule or lymph node
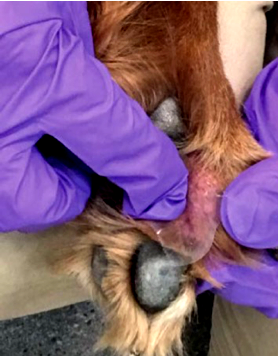
Scraping the surface debris from the skin
Scraping of the surface debris from the skin is performed using either a new, sterile #10 blade or a skin spatula.
Make sure you have the following equipment: Skin spatula or a #10 surgical blade, clean glass slides, pencil,diff- Quik stain, microscope.
Here are the steps for performing this technique; a video that walks through these steps is available:
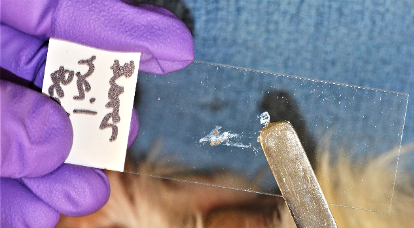
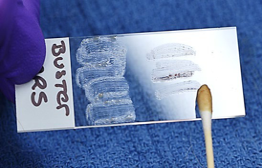
- Label a glass slide on the frosted area with the patient’s name and area of sample collection for example: “Buster” right front dorsal interdigital.
- Apply slight pressure to the skin surface to keep it from bunching up.
- Place and hold the flat portion of the blade or the blunt rounded end of the spatula on the skin at a right angle to the skin surface.
- Advance the blade or spatula in the same direction as the hair grows, using short fast strokes to collect your sample, while you hold the skin taught.
- You may need to collect your sample several times at the same site to ensure that enough useable sample is on the slide. You should be able to visualize material on the slide.
- The #10 blade or spatula can be used to collect material from multiple lesional sites as long as it is wiped clean between each use.
- This slide will then be stained using a modified Romanowsky / Wright Giemsa stain (Diff-Quik) which contains 3 different stains that are used consecutively.
- Check for collection of material on the edge of the blade or spatula by pressing and sliding the side of the blade in the center of the slide. You must press hard enough on the slide to make your sample stick to your slide and so the sample does not rinse off while it is being stained in the Diff Quik.

- Staining a sample on a slide with Diff Quik: (will NOT be demonstrated during the lab).
- Heat fix the back of the slide (not the side with the sample) with the lighter, until the back of the slide is a light smoky black in color. Make sure the slide material is dry before proceeding.
- Dip the slide into the first Diff Quik solution which is light blue and is an alcohol fixative. Allow the slide to sit in this solution for 20 seconds. Make certain that the solution covers the slide just up to the frosted end.
- Dip slide into solution I of Diff Quik which is an eosinophilic xanthene dye (orange). Allow slide to sit in this solution for 20 seconds.
- Dip slide into solution II which is a basophilic thiazine dye (deep violet).Allow slide to sit in this solution for 20 seconds.
- Rinse the slide under a cold slow trickle of water.
- Wipe off the back of the slide with a paper towel to remove the char.
- Let the slide dry.
- Examine the slide with the microscope using 10X to select ideal areas rich in basophilia for closer examination and then proceed to examine under oil immersion (100X) for organisms.
- Remember Diff-Quik does not distinguish gram-positive from gram-negative bacteria.
Here are the advantages and disadvantages of this technique:
| Advantages | Disadvantages |
|---|---|
|
|
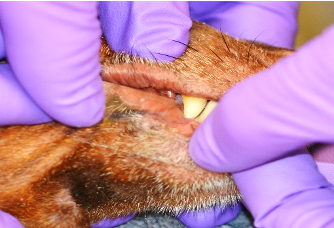
Impression Smear Technique
For the impression smear technique, material can be collected directly from the surface of the skin using a slide. Impression smear is performed using a clean slide.
Make sure you have the following equipment: Clean glass slides, pencil, Diff-Quik solutions, microscope.
Here are the steps for performing this technique:
- Label a glass slide on the frosted area with the patient’s name and area of sample collection for example: “Fluffy” right front shoulder.
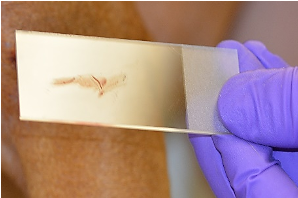
- The clean slide is pressed directly against the skin of the site to be examined.
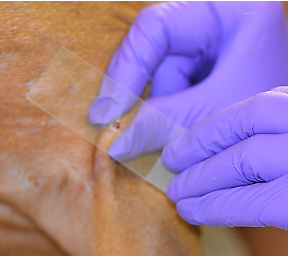
- Easily obtained when lesions are moist, exudative, or greasy and lichenified.
- Also used after removing crusts, the leading edge of an epidermal collarette, expressing fluid from lesions, or gently opening the surface of papules, pustules or vesicles. Do not use technique on dry lesions or small areas where the slide does not fit well (i.e., interdigital regions).
- Stain the slide with Diff-Quik.
- Examine slide using 100X.
Here are the advantages and disadvantages of this technique:
| Advantages | Disadvantages |
|---|---|
|
|
Tape Technique
For the tape technique, material can be collected from the surface of the skin using a new piece of clear cellophane pressure sensitive adhesive tape.
Make sure you have the following equipment: Clear cellophane pressure sensitive tape, clean glass slides, pencil, Diff- Quik solution II stain, microscope.
Here are the steps for performing this technique:
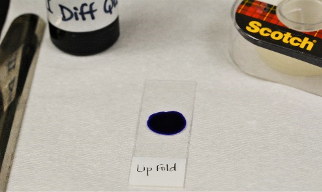
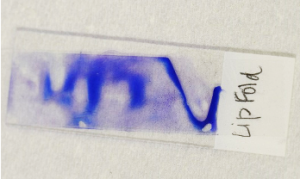
- Label a glass slide on the frosted area with the patient’s name and area of sample collection for example: “Fluffy” right lipfold.
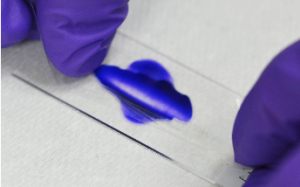
- Place a drop of Diff Quik solution II or new methylene blue statin on the center of the slide.
- Take a 3-4 cm piece of tape and press the sticky side down on the area of skin to be sampled. Press no more than two times to collect the surface material. Be careful not to touch the area of the tape you will be examining as this will contaminate your cytology with organisms on your skin, not the patients.
- Place the sticky side of the tape sample over the basophilic solution on the glass slide; the slide can be blotted with lens or bibulous paper to flatten the tape and distribute the stain.
- Exam the slide under the microscope using100X for organisms.
This technique is also used as an alternative method to superficial skin scrapings to find superficial ectoparasites such as Cheyletiella, Lynxacarus radovsky and lice. To do that, press clear cellophane pressure sensitive adhesive tape to the hair surface and the skin adjacent to the parted hair or in shaved areas. Superficial scales, parasites and debris are collected. The tape is then stuck with pressure on a clean slide (without stain or oil) and examined with the microscope on 10X.
Here are the advantages and disadvantages of this technique:
| Advantages | Disadvantages |
|---|---|
|
|
Ear Cytology Collection
Cytology from ear (aural) exudate can be collected by a direct technique. Ear cytology is performed using a separate cotton-tipped swab for each ear.
Make sure you have the following equipment: Cotton tipped applicator/swab, clean glass slides Diff-Quik stain, oil, cover slips, pencil, microscope.
Here are the steps for performing this technique; a video that walks through these steps is available:
- Using a pencil, label the frosted end of the slide with the patient name and the location indicator “ears”.
- Grasp a clean medical grade (long shaft) midshaft to prevent the swab from breaking off in the ear canal.
- Hold the ear pinna in your non-dominant hand and gently pull it up to expose and open up the vertical canal.
- Place the cotton swab into the intratragic incisure of the vertical external earcanal.
- Gently, advance the swab until you reach the junction with the horizontal part of the external ear canal.
- Rotate the swab in either a clockwise or counterclockwise direction to collect aural debris. Spread a thin film of exudate on one side of a clean glass slide without oil. Dispose of the swab.

- Thick exudates do not stain well with Diff-Quik and are difficult to read with the microscope.
- By convention, the left ear sample will be rolled onto the left half of the slide which is considered to be the side next to the frosted part of the slide where the patients name would be written; the right ear sample will be placed onto the right half of the slide.
- Collect aural exudate from the other ear as above using a new swab and place the sample on the same clean slide used above but on the opposite side of the previously collected exudate.
- Heat fix and stain the slide in Diff Quick, wait until dry and observe using 100X.
Aural Parasites: Otodectes cynotis, Demodex canis, and Notoredres cati can be identified by performing steps a-c under otic cytology. Next, place a drop of mineral oil on the clean slide, take the aural material collected on the swab and mix it into the drop of mineral oil, until a homogenous suspension of the exudate and oil is achieved. Place a coverslip over the oil-exudate mixture; ensuring that the coverslip is floating evenly over the collected material (i.e., no air bubbles) and examine the entire area under the microscope using 4X or 10X objective. If the sample is thick, focus up and down to ensure that the sample is thoroughly examined. Dropping down or closing the iris diaphragm of the condenser may make the mites easier to visualize. Record the number of eggs, juveniles and adults.
Fine Needle Aspirate Method
Cytology from nodule, mass, or lymph node can be collected by a direct technique. Fine needle aspirate is performed using a 22- 25 gauge (G) needle and either a 3 or 6-mL syringe
Make sure you have the following equipment: Needles, 3-6-mL syringes, clean glass slides, Diff-Quik stain, pencil, microscope.
Here are the steps for performing this technique (please note that the numbering in the figure below does not match the text instructions):
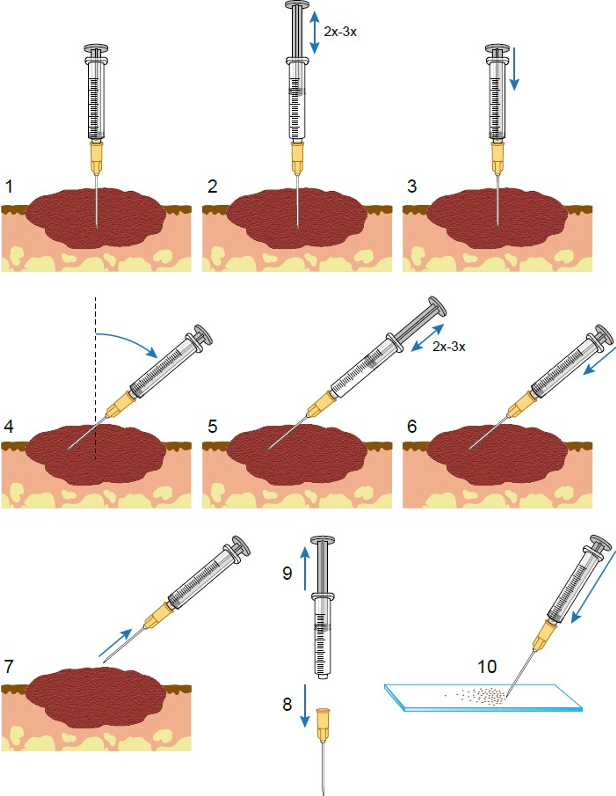
- Preparations
- The lesion may need to be clipped to be visualized.
- Solid lesions should be immobilized using the thumb and forefinger of one hand.
- Fenetration method
- Use the other hand to fenestrate the mass several times in different directions using the 22-25 G needle.
- The cells collected within the needle are then expelled by attaching and air-filled 3 mL or 6 mL syringe to the needle and blowing the contents of the needle onto a glass slide.
- Aspiration method
- If no material is obtained through the fenestration method, the lesion should be sampled using a 22-25 G needle with a 6- or 10- mL syringe attached and aspirated to create suction and withdraw the cells from the tissue.
- In the aspiration method, the needle is introduced into the lesion, and then suction is gently applied by withdrawing the plunger of the syringe ½ to ¾ of the syringe volume. Suction is then interrupted while the needle is re-directed into another area of the mass. Suction is again applied and this procedure is repeated for a total of 2 or 3 times. Suction is then released, and the needle withdrawn from the lesion.
- The syringe and needle are then separated, air is introduced into the syringe, the needle is reattached, and the contents of the needle and hub are expelled onto the surface of a glass slide. The material is then streaked across the surface with another glass slide.
- Staining and observing
- Stain with Diff-Quik as above however DO NOT heat fix the slide with the lighter. Specimens to be examined for cellular integrity should not be heat fixed.
- Observe under both low power 4X-10X to reveal a suitable area for closer examination under 100X to identify cell type and the cellular atypia.
A 2019 article “Fine needle aspirate of cutaneous, subcutaneous and intracavitary masses in dogs and cats using 22- vs 25-gauge needles” Vet Clin Pathol. 2019 Jun;48(2):287-292. doi: 10.1111/vcp.12751 found the ability to make a cytologic diagnosis was not significantly affected by needle gauge.
Here is a video on the Fine Needle Aspirate method by Independent Veterinary Pathology.
Cytology Examination and Interpretation
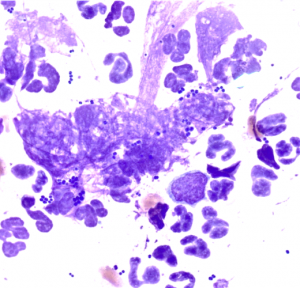
Cytologic study is helpful in distinguishing between bacterial skin infection and bacterial colonization, determining the relative depth of infection, determining whether the pustule contains bacteria or is sterile, discovering yeast and fungi, identifying various cutaneous neoplasms, or finding acantholytic cells of pemphigus diseases.
The ear canals, ventral neck, axilla, and interdigital areas are good sites to demonstrate a variety of normal differences in skin surface cytology.
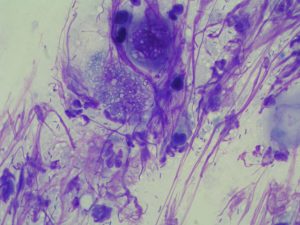
Normal structures found include squames (angular, anuclear, keratinocytes) occasional nucleated keratinocytes, wax and lipid from ear canals, and surface debris. Occasionally, free melanin granules may be seen but they mostly reside within the keratinocyte. Melanin granules should not be mistaken for bacteria (a common mistake for beginners). Melanin granules are from samples obtained from pigmented areas of the skin. They are golden brown in color and mostly rod- shaped; they have a refractive/reflective quality when going in and out of fine focus are considered normal. Similarly, intracellular eosinophilic granules found in keratinocytes that are of various sizes and shapes are keratohyaline granules and should not be confused for infectious organisms.
Evaluation of normal healthy skin allows one to visualize and appreciate the incidence of normal surface bacteria and yeast.
Here are the steps for performing this technique:
- Place the slide on the microscope stage with the frosted end to your left.
- Scan the entire slide at low magnification (4X) to identify the quality of the smear and cellularity. This low power scan also allows identification of cell types (acantholytic cells) that might be missed under 100X. Once a highly cellular area is identified, examine this area under 100X. Ideally, you want to locate an area that is stained deeply basophilic to start your examination as it will be easier to focus.
- Maximize the light when examining under 100X (condenser open or raised); opposite for examining superficial and deep skin scrapings for parasites.
- Assess the presence and number of microorganisms under 100X. Examine at least 10 representative high power fields, then record the type/shape (s), numbers using the semi-quantitative scale presented below, whether the bacteria are intra- or/and extracellular and the associated cellular response of the skin as indicated by the inflammatory cell type.
| Classification | Description |
|---|---|
| Rare | 1-3 organisms per entire slide |
| Occasional | Average of 1-5 organisms per OIF |
| 1+ | Average of 6-10 organisms per OIF |
| 2+ | Average of 11-20 organisms per OIF |
| 3+ | Average of 21-30 organisms per OIF |
| 4+ | Average of 31-40 organisms per OIF |
| TNTC (too numerous to count) | Massive amounts of organisms per OIF you can’t possibility count them; rapidly detected without difficulty |
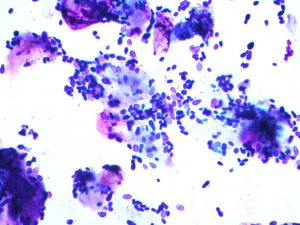
Bacteria are the most common identified organisms on surface cytology. The two shapes you can find are round (cocci) or linear (rods):
- Cocci are basophilic bacteria found individually, in clusters or in large groups. They can be intracellular and extracellular. Cocci are most often Staphylococci, or Streptococcus sp..
- Rods are basophilic and can be found individually or in sets of 2 placed end to end, called diploid rods. Rods are often Escherichia coli, Pseudomonas sp., Klebseilla sp. or Corynebacterium sp.
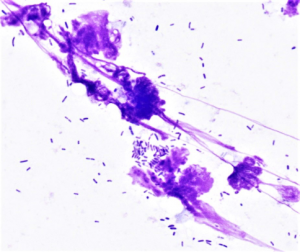
Malassezia yeast are larger than bacteria, have a bottle-or peanut shape (budding yeast), stain variably from light blue to dark violet and are always extracellular and often stick to corneocytes.
Nuclear Streaming is seen when cells rupture during sampling, nuclear content (DNA) appears as fine threads of eosinophilic material. It can be extremely useful to help outline fungal spores and highlight bacteria in the sample.
What is Considered Normal?
Malassezia are rarely seen in samples from normal skin, can be present in healthy ears, and can be abundant in specimens collected from greasy seborrhea or ceruminous otitis. Usually only 1 or 2 are found on 1.25-cm2 (0.5 inch2) or <1 organism per oil immersion field (OIF) on healthy skin with no clinically observed abnormalities. Normal yeast counts for canine ears have been reported to vary between 2.8 and 8 at 400X. Others report that cytologic preparations of a normal external ear canal may contain corneocytes, amorphous material (cerumen) and small amounts of Malassezia yeasts (< 5 / OIF). In the case of Malassezia otitis externa, the number of yeasts is higher than 5–10 / OIF.
Normal hair and skin are colonized by bacteria, the numbers at any one body site vary regionally, with moist areas (chin, lip fold, interdigital web, abdomen) typically more heavily colonized.
- The numbers of resident bacteria on the skin tend to vary among individuals; some animals have many organisms, whereas others have few.
- Individuals with oily skin have higher counts.
- Total counts of aerobic organisms on normal skin range from 100 to 1000 organisms/cm2!
- So general guidelines, virtually any dermatosis can involve organisms. If the organisms are 1) isolated from intact primary lesions, 2) associated with inflammatory cells or 3) associated with secondary lesions, they are likely contributing to infection and are not just associated with colonization.
Several lesions should be sampled to look for consistent findings. The diagnosis should not be based on a single finding.
Conversely, if a lesional site was sampled and was negative for organisms, interpret the results with care. Cytology can be low yield.
Cytology is used as adjunct and supports but is not a replacement for cases that also need microbial cultures and histopathology.
Inflammatory Cells
The type of inflammatory cell present may give clues as to the underlying cause:
- Neutrophils: bacteria, immune-mediated disease, tissue injury.
- Eosinophils: fungal agents, allergy/hypersensitivity, cutaneous eosinophilic syndromes, ectoparasites, protozoa, some neoplasms (e.g., mast cell tumors and T-cell lymphoma); eosinophils in combination with neutrophils may represent furunculosis caused by free keratin and hair shafts acting as endogenous foreign bodies.
- Lymphocytes: chronic disease, immune-mediated and cutaneous lymphoma.
- Plasma cells: chronic disease, immune-mediated disease.
- Macrophages: fungi, sterile and infectious granulomatous disease, Mycobacteria, tissue injury/necrosis, cystic lesions.
Common Artifacts and Incidental Findings
These can include the following:
- Precipitation of stain appears as variably coarse, granular pink/purple material. It may be seen in the background but can cover cells and bacteria, and care should be taken to distinguish it from cytoplasmic granules or even intracellular bacteria.
- Glove powder starch crystals are round with a characteristic cross in the middle and should be distinguished from mineralized debris.
Wrapping Up
You are now able to do the following:
- Use three different methods to collect surface cytology from the skin, and select an appropriate method depending on the anatomical site and the type of lesion.
- Obtain appropriate samples atraumatically from both ear canals for otic cytologic analysis.
- Stain your cytologic preparation for microscopic evaluation and interpret the findings – cytologic findings help you to formulate differential diagnoses and formulate treatment plans.
- Identify aural mites, bacterial and yeast organisms
- Identify findings on normal and abnormal otic cytologic preparations
Next, we will learn how to collect deep and superficial skin scrapings.
Before Moving On …
Use the self-check activities below to check your understanding.
(Under development)