Skill Group: Dermatology
Goal Seven: Skin Biopsy
Before You Start …
Make sure you have the following equipment: mayo stand with tray, gloves, marker pen (Sharpie), lidocaine, 25 G needles and syringes, gauze sponges, slivers of tongue depressors or cardboard, skin punch biopsy instruments (4-8mm), thumb forceps, iris scissors, scalpel blade if performing a wedge biopsy, needle holders, suture material, labeled numbered specimen jars with 10% formalin with patient’s name, biopsy site, medical record and date.
Introduction
The skin biopsy is one of the most useful tests in veterinary dermatology. Although the provided results are often very frustrating to the general practitioner when the correct sites are not selected or other important steps are skipped. Biopsies are not a replacement for “derm due diligence”, most importantly skin scrapings, cultures and cytology. Maximization of the potential benefits of this tool necessitates enthusiastic skilled teamwork between the clinician who has carefully selected, procured and preserved the specimens and a pathologist who has carefully processed, perused and interpreted the specimens.
Learning Outcomes
By the end of this lesson, you should be able to:
- Perform skin biopsies for histopathology, identify appropriate sites for sampling, prepare the site and suture the site
- Describe when a biopsy for histopathology is indicated.
- Evaluate the patient’s lesions and select appropriate sites to biopsy.
- Select and organize the equipment needed to perform a punch biopsy.
- Explain the importance of biopsy site preparation.
- Define the individual steps to collect usable samples for histopathologic evaluation.
- List the biopsy sampling Do’s and Don’t’s.
Indications
Skin biopsy for histopathology is performed when dealing with a poorly responsive disease, neoplasia, immune-mediated disease (vasculitis, autoimmune, drug reaction), endocrine-like disorder (hypothyroidism, hypercortisolism, follicular dysplasia), keratinization defect (ichthyosis, sebaceous adenitis, primary seborrhea) or when conditions occur that can only be confirmed by histology are expected. Biopsies are also indicated if the skin lesions appear unusual, or to rule out common differential diagnoses and narrow down the list.
Biopsy Sampling Tips
- Preparation: Very gently clip or scissor if necessary.
- Do not surgically prepare the site if sampling lesions in epidermis or dermis.
- Caveat: Can surgically prepare site for excision of lesions deep in the subcutis or to remove large nodular mass such as a neoplasm.
- Lesions:
- Identify primary lesions for biopsies, these are representative of the primary disease process and provide a greater chance of a diagnosis from the samples.
- Secondary lesions are generally non- specific and rarely yield a definitive diagnosis but if secondary lesions represent the majority of the disease collect these as well (crusts, scale and collarettes).
- Collect multiple samples representative of the range of lesions.
- If crusting is significant, collect crust. You can wrap the crust in lens paper and place in formalin, and be certain to tell the pathologist that the sample contains a crust for evaluation.
- For erosive or ulcerative lesions, where no primary lesion is identified (pustule, vesicle), obtain the biopsy from the junction of the edge the erosion/ulcer and normal skin.
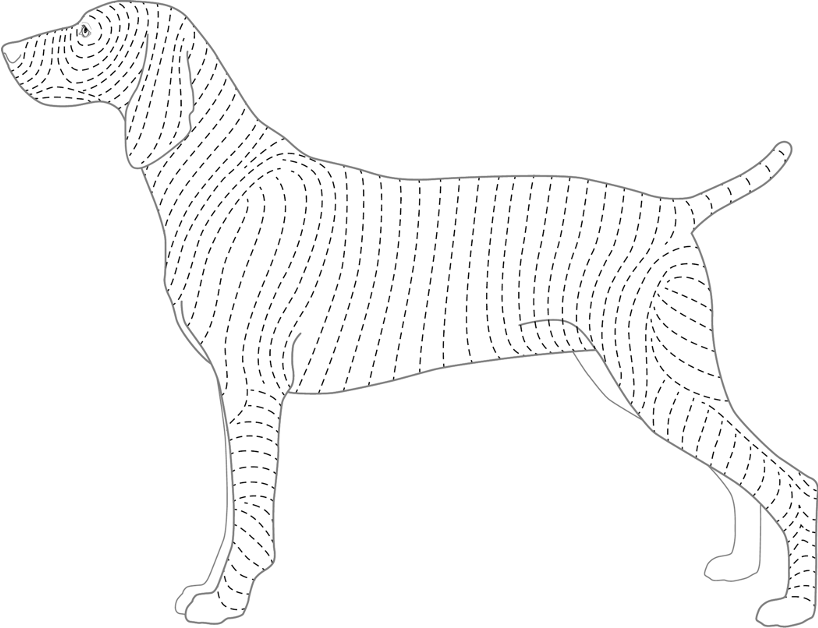
- For alopecic conditions, collect three samples: one from the most alopecic areas, one from the partially haired (transitional zone) and one with normal hair or least affected. Draw a line on the sample in the direction of the hair growth.
- Punch samples
- Use 6-or 8-mm punch instruments for haired skin.
- Use 4-mm punch for periocular skin, paw pads, or nasal planum.
- Incisional and Excisional samples
- Use incisional or excisional methods if smaller punch would damage large pustule or vesicle.
- For lesions in the panniculus, use incisional or excisional method or double punch method to ensure that the sample is of sufficient size and depth for diagnosis.
- Fixation
- Fix samples in 10% buffered formalin with 10:1 ration volume of formalin to tissue and tissue thickness of less than 1 cm is ideal.
- To prevent warping in the fixative, punch, and thin excisional biopsy specimens should be gently attached to a flat object, such as a piece of cardboard or tongue depressor and permitted to dry for 20 to 30 seconds, not longer. Immerse the specimen and flat object in formalin.
It is extremely important that you submit the patient’s history with differential diagnoses or specific conditions you would like to rule out. Include the location and type of lesion biopsied.
Patient history should include the following:
- Age, breed, sex.
- Lesion distribution, appearance, severity and duration.
- Influence of specific and/or recent therapy that could change lesions.
- Current/previous therapy and clinical response.
- Other clinical problems.
- Report additional diagnostic testing and results (e.g., bacterial culture or blood work abnormalities).
- Clinical differential diagnoses.
Biopsy Sampling Do’s and Don’t’s
Do’s
- Consider whether referral to a veterinary dermatologist may be a better option than biopsy sampling.
- Be gentle.
- Biopsy early.
- Biopsy before using anti-inflammatory therapy or stop therapy 2-3 weeks prior to biopsy.
- Use the correct biopsy procedure for the type of lesion.
- Promptly immerse samples in formalin.
- Put each sample in a separate numbered formalin container or cassette and record the location from where the sample was taken as well as a description of the lesion.
- Prevent samples from temperature extremes during shipping.
- Submit a detailed written history (photographs and lesion maps are also super helpful).
- Request a complete microscopic description from the pathologist, not just a diagnosis, as this may help a dermatologist determine the cause of the problem if not apparent from the biopsy report.
Don’t’s
- Don’t surgically prepare the site if lesions are in the epidermis or dermis.
- Don’t use electrocautery or laser for small biopsy samples.
- Don’t biopsy the center of an ulcer.
- Don’t grasp the punch biopsy samples or lesion areas of samples with tissue forceps.
- Don’t’ use a biopsy instrument that is too small (4 mm is the minimum useful diameter).
- Don’t use dull or previously used punch biopsy instruments as these will shear and distort tissue and create artifacts.
Technique
Administer mild sedation if needed. General anesthesia is preferred when biopsying sites such as the nasal planum, mucocutaneous junctions, oral cavity, claws, ears, paw pads, digits, and tail.
Here are the preparations for performing this technique:
- NEVER scrub the skin surface, this could remove important diagnostic information. This is NOT a sterile procedure.
- Hair overlying the lesion may be gently trimmed or clipped with a #40 blade, but the clipper blades should not touch the skin or crusts, if present.
Here are the steps for performing this technique; a video that walks through these steps is available::
- Provide local anesthesia using 1-2% lidocaine or bupivacaine at the biopsy site. Insert a 25 G needle parallel to the lesion and inject the lidocaine into the subcutis (not the dermis) under and around the biopsy site slowly raising an intradermal bleb. Allow enough time (at least 5 minutes) to reach full effect before beginning the biopsy.
- Tip: Sodium bicarbonate can be added to lidocaine/bupivacaine to reduce stinging in a 1:9 ratio. For example: 0.1 ml of bicarbonate to 0.9 ml lidocaine.
- Recommended safe dose of 2% lidocaine: dogs-1.1.5ml/4 kg and cats – 0.5-0.75 ml/4 kg (dilute 50:50 with saline if larger volume is needed).
- This step can be omitted if the patient is under general anesthesia.
- Place tension on the skin by stretching the skin at an angle that is perpendicular to the skin tension lines. This helps create an elliptical wound that is easy to suture without puckering. Holding the punch in your hand and placing the fifth finger of that hand adjacent to the lesion for stability. (Select image below to open a larger version)
- Position the punch biopsy instrument over the center of the lesion (preferably) at a site where only abnormal tissue is sampled. If normal skin is needed for comparison, take a sample from an adjacent area. The only time a lesion should be biopsied on the margin is in the case of ulcerative skin disease. If a large lesion appears to be different in the center from the leading edges, either do an elliptical biopsy or alternatively obtain biopsy samples from both areas.
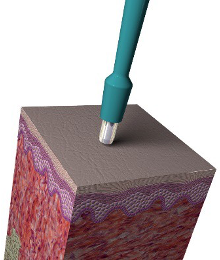
- Gently apply rotational and downward but firm pressure on the punch instrument until you feel the “give” as it enters the layer of subcutaneous fat. Rotate the biopsy punch firmly in one direction. The punch should rotate freely once in the subcutaneous fat. Rotating the punch back and forth instead of in one direction can cause a shearing artifact. Withdraw the punch at a 45° angle and blot any bleeding with gauze.
- Support the cylinder sample of tissue from its underside (i.e. do not crush) by using thumb or Adson forceps to grasp the underlying fat, avoiding iatrogenic damage to the dermis. Alternatively, in samples where using forceps are not possible, insert a 25 G needle horizontally through the deep dermis or subcutis and use as a lever to lift the sample up and cut the sample free at the level of the fat using iris scissors. The fat layer is often loose, and you may be able to remove the specimen without cutting the base. Blot the subcutaneous side of the sample on gauze to remove excess blood. Place compression on the biopsy site to control hemorrhage. Confirm that no tissue has been inadvertently left in the punch instrument. Place the sample on a flat piece of cardboard or sliver of tongue depressor to minimize curling during fixation. Let rest for 20-30 seconds, then place immediately in formalin. Time from removal of the biopsy sample to formalin immersion should be as short as possible (seconds not minutes). Make certain that the sample obtains full immersion and is not just floating on the surface of the formalin.
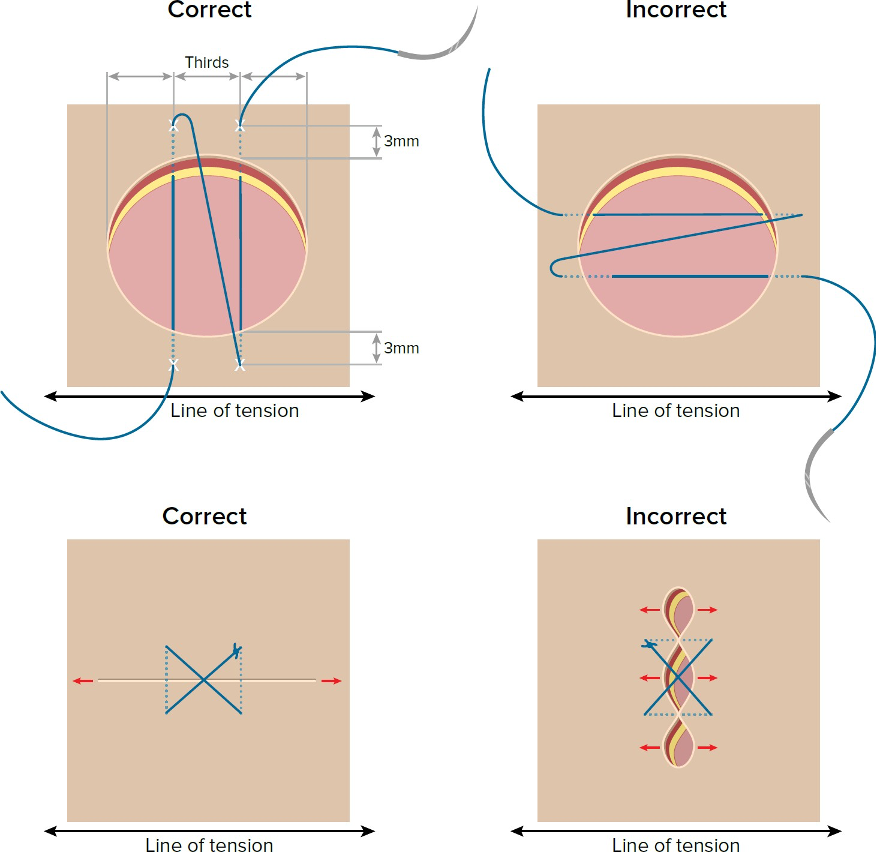
- The wound may be sutured. Use non-absorbable 3.0-4.0 suture material swaged onto a cutting or reverse cutting needle. Acceptable suture non-absorbable monofilament suture for skin is nylon or polypropylene as they stimulate less tissue reaction, are less traumatic, and may provide a better cosmetic result. If non-absorbable monofilament suture is not available, absorbable suture can be used. Place one, two, or three simple interrupted sutures, depending on the size and the location of the defect. For an area measuring 4 to 5 mm, place one to 2 simple interrupted or cruciate sutures. Sutures should be placed perpendicular to the long axis of the punch defect or perpendicular to the skin tension lines. (Select image below to open a larger version) (Jump to Suture Patterns)
- Sutures should be removed in 10-14 days; an e-collar or other physical barrier may need to be placed on the pet to avoid the pet traumatizing the biopsy sites.
Here is a video on taking a skin biopsy by Independent Veterinary Pathology.
Suture Patterns
(Jump back to to step 7 of performing skin biopsy)
Forehand Stitch
- Position needle in the needle holder: The first step in performing a forehand stitch is to correctly position the needle in the needle holder. When deciding on the positioning, keep in mind the factors such as the width of the wound and the type of tissue being sutured.
- Grasp the needle holder: The second step is to grasp the needle holder using one of the four needle holder grips (Tripod, Thenar, Palm, Pencil). When selecting a grip, consider the amount of force needed to penetrate the tissue, on other words, consider the tissue density and how accurate the tissue bites need to be.
- Position suture end: In the third step, position the free end of the suture away from your side of the field or toward and assistant.
- Proper needle placement: When you are ready to begin the stitch, place your hand in a pronated position, with your palm slightly away from your body. This will allow you to rotate the needle through a full 180° of supination.
- Advance needle through tissue: The next step in placing a stitch involves advancing the needle through the tissue. Using a curved needle, two forces need to be balanced; the driving force pushes the needle forward, and the rotating force keeps the proper needle curve in the tissue. The surgeon must balance each force throughout the needle track. As you complete the drive, try to advance the needle so that as much of the needle shaft as possible is exposed on the near side, in order to facilitate needle extraction. (ALTERNATIVE METHOD: One alternative method to placing stitches is the “single dipping” technique. In “single dipping,” the two opposing sides of the wound are sutured without re-loading the needle, as is necessary in “double dipping”. Single dipping can be performed to save time while suturing, assuming that the needle is long enough to allow for needle extraction. Keep in mind however, the better alignment of tissue can be accomplished if separate bites are taken on each side of the wound, as is done with double dipping technique.)
- Releasing and extracting the needle: The next step involved in placing a stitch relates to releasing and extracting the needle. When the needle is released from the jaws of the needle holder, there is a tendency for the needle to retract or dislodge from the tissue. To prevent this problem, you can use tissue forceps to grasp the needle before it is released, being careful to avoid grasping the sharp tip. Alternatively, you can use tissue forceps to hold the tissue on the needle, stabilizing it until the needle holders can be reapplied.
- Regrasp the needle: Regrasp the needle in the needle holders. The main thing to focus on in this step is to regrasp the needle perpendicular to the jaws of the needle holder on the first try. In this position, the needle holders are ready for the next bite, and you do not need to readjust the needle further.
- Extract needle from tissue: The needle is extracted from the tissue. Grasp the needle with your hand in a supinated position, palm facing towards you. This will allow you to extract the curved needle using the full range of motion of your wrist and forearm. Using the supinated position, the next stitch can be made without adjusting the needle in the holder, saving time.
- Pull the suture through the tissue: The final step in performing a forehand stitch is to pull the excess suture through the tissue.
Simple Interrupted Suture
- Take a bite through the far skin margin 0.5 to 1 cm from the edge. Exit out the near skin margin the same distance from the edge.
- Take a second bite similarly, 0.5 to 1 cm parallel to the first.
- Tie a surgeon’s throw, tightening the suture so that it is in contact with the skin without compressing it.
- Tie a second throw, leaving a small loop between it and the surgeon’s throw as you tighten
- Tie the third and fourth throw to the second throw to form a secure knot about the loop.
Cruciate Suture Pattern
Review the “CSL: Cruciate suture pattern” video by TiHoVideos.
Interpretation
Below are some uses of results obtained from a skin biopsy submitted for histopathologic evaluation:
- Help guide clinical therapy.
- Re-direct clinical work-up.
- Help establish a diagnosis in conjunction with clinical history and lesion characteristics.
Remember that a skin biopsy can sometimes not give a diagnosis that is made easily another way. Common examples include: ectoparasite infestations, bacterial pyodermas, dermatophytosis and Malassezia dermatitis. Skin biopsies are not helpful when a secondary infection is present, therefore try to resolve the secondary infections before performing a biopsy for histopathology.
Wrapping Up
You are now able to identify a spectrum of lesions representative of a dermatological disease process that should be selected for biopsy. You know how to prepare the site for biopsy, use a biopsy punch to collect a sample atraumatically and prepare it for formalin fixation. Importantly, you can provide all the necessary information that must be submitted with the sample to aid the dermatopathologist with interpretation. These skills will aid you in confirming or ruling out differential diagnosis, formulating a treatment plan or re-directing the clinical work-up.
This concludes the skill module.
Before Moving On …
Use the self-check activities below to check your understanding.
(Under development)