Skill Group: Clinical Skills
Dental Charting
Before You Start …
Make sure that you have already mastered the contents and skills in lessons 1 through 4, as they are essential for being able to successfully master this lesson.
Introduction
You are now ready to practice dental charting. This is a main component of our day-to-day examinations in the dental suite here at The Ohio State University Veterinary Medical Center (OSU VMC). In order to correctly identify pathology and develop an appropriate treatment plan, you will need to effectively chart your patient’s mouth. Your patient will be anesthetized, so it is very important to chart with efficiency to minimize the amount of anesthetic time.
Learning Outcomes
By the end of this lesson, you should be able to:
- Choose the appropriate instrument to chart the mouth.
-
Chart the dental structures in a systematic fashion
- Count teeth while checking for mobility using the Shepherd’s Hook
- Identify missing teeth
- Using the dental probe, check gingival sulcus depth – this will be covered in another lab session.
- Identify abnormal depth – this will be covered in another lab session.
- Identify abraded, crowded and fractured teeth
- Identify if a fractured tooth is complicated or uncomplicated.
- Identify furcation exposure and mobility with appropriate grades.
- Identify oral masses with appropriate location.
Dental Charting: Procedures
It is good practice to have a standard approach to any systematic evaluation. There are many ways to consider performing the process of charting; you will learn one of these variations.
Before you can start charting, you must first orient yourself to the position of the patient. Dental procedures can be performed with a patient in the following positions:
- Lateral recumbency (laying on its side);
- Dorsal (laying on its back) recumbency; and
- Ventral (laying on its abdomen/chest) recumbency.
Make note of your patient’s position mentally, so you can begin with the 100 quadrant.
Your technician will write your findings on the dental chart, which will be included in the patient’s permanent Medical Record. Remember to verbalize your abnormal findings.
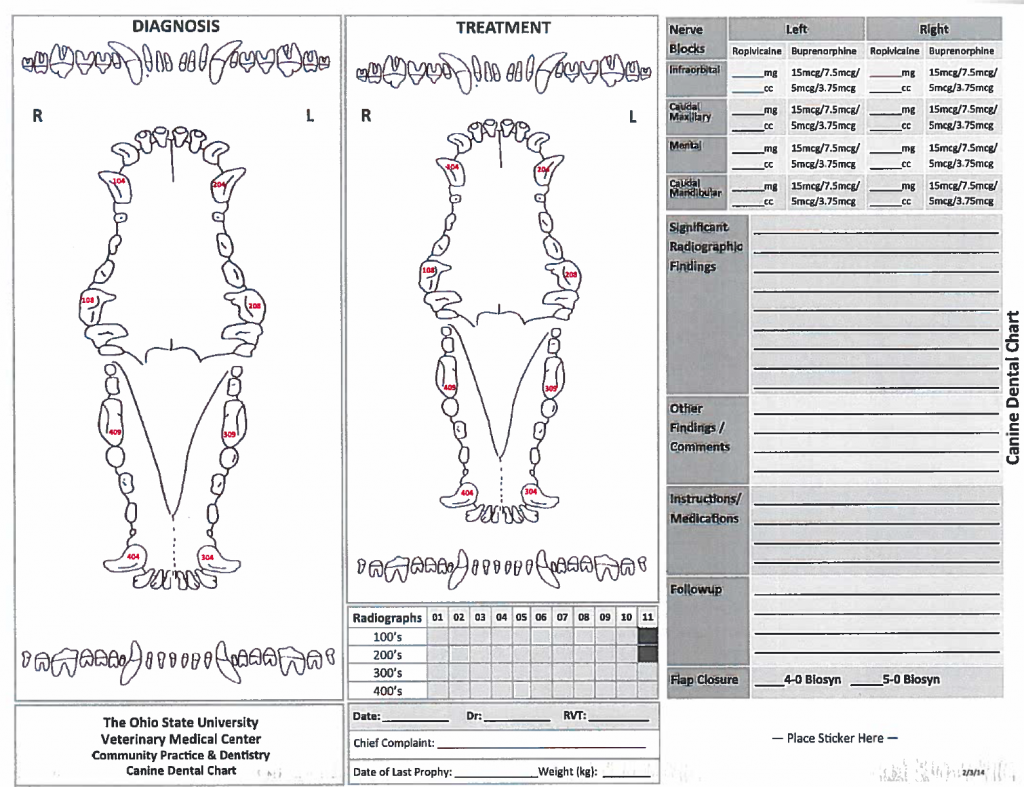
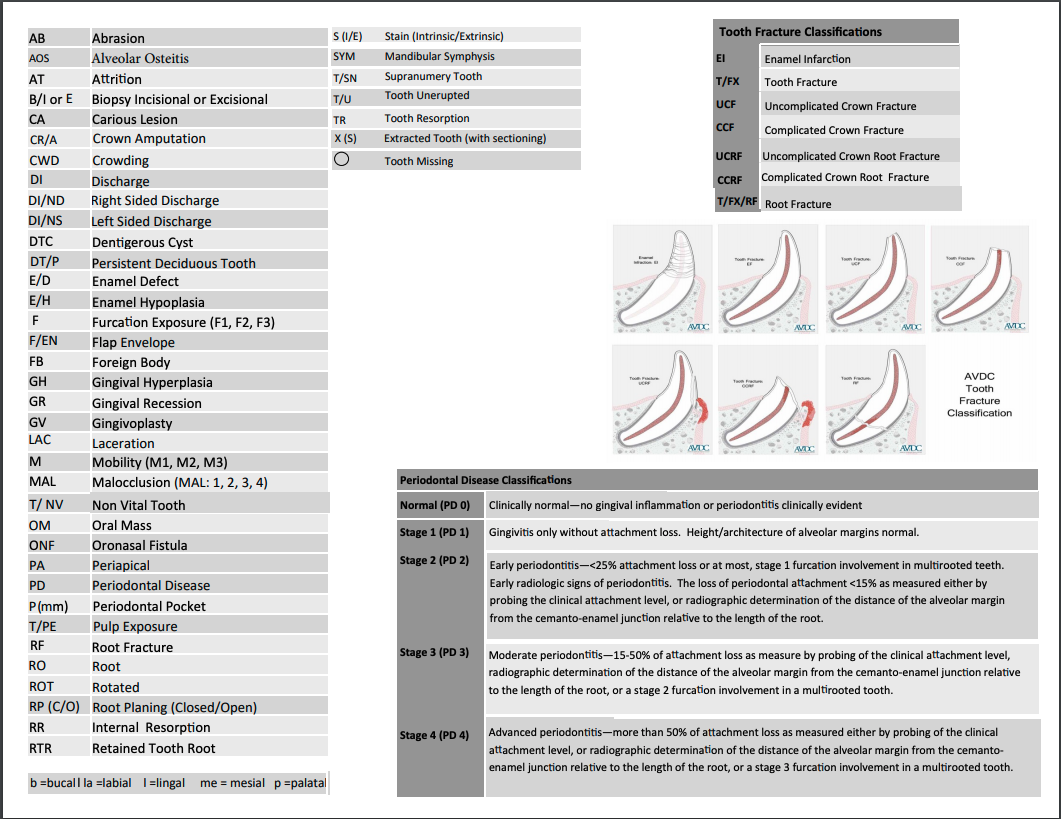
*An example of the dental chart used in The Ohio State University Veterinary Medical Center Community Practice and Dentistry service is provided below. The chart is double sided. The front side has information regarding diagnosis and treatment of the patient’s oral cavity. The back side has examples of common dental abbreviations as well of classification charts. Your findings will be recorded on the front side of the chart in the diagnosis section. Now let’s begin...*
Steps of Dental Charting
- First, before beginning the actual dental portion of the exam we evaluate all the oral and extraoral structures. These include the facial bones (the mandible and maxilla), the tongue and sublingual area, the buccal folds, the retropharyngeal area and tonsils, and the local lymph nodes. This will be taught in more detail in a later module.
- Next, picking up the periodontal probe with explorer, we will count the teeth starting at 101 and proceeding to 110. This will enable you to determine if all the teeth are present. If any tooth is missing, you will tell your technician and it will be recorded on the dental chart. Missing teeth are recorded by circling the corresponding tooth on the dental chart.
- As you count each tooth, use the explorer end (ours is typically a Shepherd’s hook) to encircle the tooth and check to see if the tooth is mobile or firmly attached in its socket. Mobility is recorded with an M1, M2, or M3 depending on the degree of movement and a line drawn to the affected tooth. A greater than sign (>) can be used to notate two adjacent teeth are mobile or a brace sign ( } ) to show more than two adjacent teeth are mobile as long as the degree of mobility is the same.
- Once you have completed counting in the 100 quadrant, you will switch the end of your instrument to the periodontal probe and begin to probe the gingival sulcus around each tooth starting at 110 proceeding to 101. This will enable you to determine if there are gingival pockets greater than normal. Remember normal pocket depth in dogs is up to 3 mm (depending on size of the patient) and in cats is 0.5 – 1 mm. Only verbalize abnormal pocket depths in mm to your technician. Again, this will not be covered during this lab session. This will be taught in more detail in a later module.
- As you check each tooth for an abnormal gingival sulcus depth, you should also be closely examining each tooth for any additional abnormalities.
- You want to see an entire gingival collar around each tooth. If two teeth share one gingival collar or there is no gingiva between two adjacent teeth – these teeth should be recorded as crowded. Crowding is notated by using a greater than sign (>) with the open end pointing to the two teeth involved and CWD notated at the closed end. If more than two teeth are involved a brace sign ( } ) should be used to notate which teeth are affected with those teeth included in the open side of the brace and CWD noted at the closed end.
- As we continue to evaluate the gingiva, we should evaluate the area of the furcation on both sides of each tooth. As we discussed in the pathologies section, if the probe can be inserted into the area of the furcation less than 50% under the crown, this should be noted as an F1 with a line drawn to the affected tooth. If the probe advances greater than 50%, but not all the way through to the other side, this should be noted as an F2. Finally, if the probe can be inserted into the furcation and goes all the way through to the other side of the tooth, this is considered an F3 and should be noted as such.
- Before we move to the tooth surface, we want to note if there are any gingival or oral masses around each tooth. If we do notice a mass – first, do not use your probe or explorer to touch it. If you touch it, please get another sterile probe to complete your dental exam as we do not want to potentially spread any type of neoplasia throughout the oral cavity. In order to notate a mass, we draw a line to the affected tooth with OM noted and the directional terms to describe the location of the mass around the tooth ie lingual, buccal, palatal, distal, mesial, etc.
- If the surface of the tooth is irregular from abrasion, this should be recorded as AB with a line drawn to the affected tooth. This typically looks like abnormal wear of the enamel or enamel/dentin surface often with staining from the foreign object having caused the abrasion.
- As you continue to evaluate the surface of each tooth, check to see if there are any fractures. Often you will not see the actual fracture itself, but a piece of the tooth will be missing. We typically see the tip of a crown or a slab off the side of the tooth is gone. At this point, you have to evaluate whether the fracture is complicated or uncomplicated. We do this by taking the explorer end of our probe (ours is typically the Shepherd’s hook) and dragging it across the entire fractured surface. The surface will be rough as it has been filled in with tertiary dentin. However, if at any time the explorer tip goes into the pulp cavity or gets “stuck” or “catches” in the fractured surface this is considered a complicated fracture. We will assume for this lab the fracture has only affected the crown. It should be notated with a line to drawn to the affected tooth on the dental chart and T/Fx/CCF notated. If the explorer moves easily across the surface of the fracture without any resistance or snags, the fracture is considered uncomplicated as the pulp cavity is NOT involved. A line should be drawn to the affected tooth and T/Fx/UCF noted on the dental chart.
- After you have completed these steps for the 100 quadrant, you will move to the 200 quadrant and complete the exact same process.
- After the 200 quadrant, you will move to the 300 quadrant and finally the 400 quadrant completing your entire assessment of the dental structures.
**Please note there are additional dental lesions that occur to the teeth and these will be discussed in later modules. The presence of these lesions should be evaluated in a systematic fashion as you check each tooth and documented as described above prior to moving on to the next mesial tooth.
Dental Charting: Documentation
Missing Teeth
Missing Teeth: Tooth 102, 110, 206, 301, 302, 303, 311, 401, 402 and 405 are missing. Each tooth is circled to denote it was not present during our dental exam.

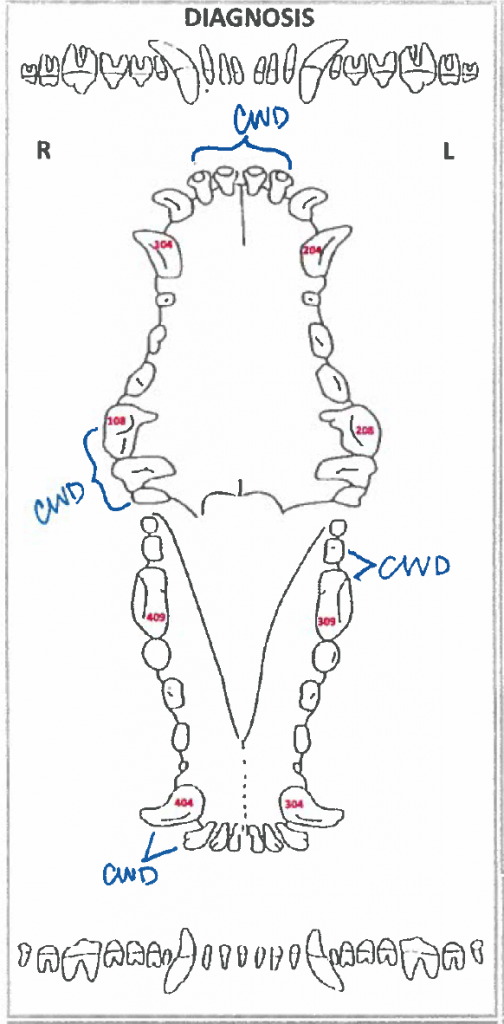
Crowding
Crowding: Tooth 102 and 202 are crowded. Tooth 108, 109 and 110 are crowded. Tooth 309 and 310 are crowded. Tooth 403 and 404 are crowded. Each set of teeth have been noted with CWD.
Uncomplicated Crown Fracture
Uncomplicated Crown Fracture: Tooth 107 and 309 have uncomplicated crown fractures. Each is noted with T/Fx/UCF.
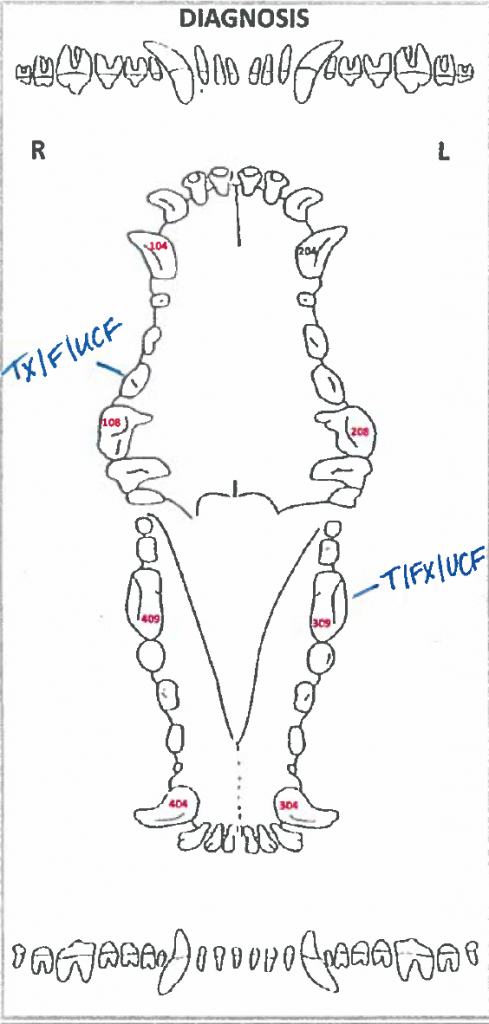
Complicated Crown Fracture
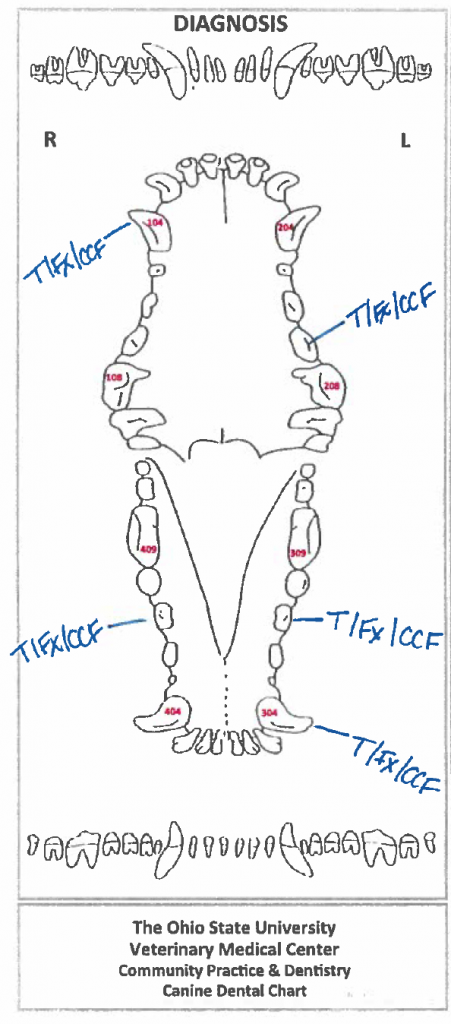
Complicated Crown Fracture: Tooth 104, 207, 304, 307, and 407 have complicated crown fractures. Each is noted with T/Fx/CCF.
Abrasion
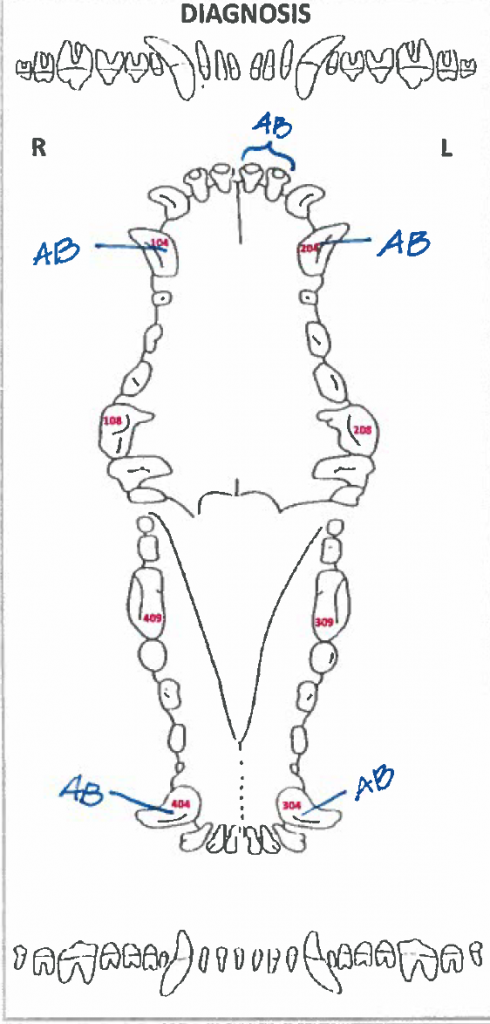
Abrasion: Tooth 104, 204, 304 and 404 have abrasions. Each has been noted with AB. This might happen with a cage chewer.
Furcation
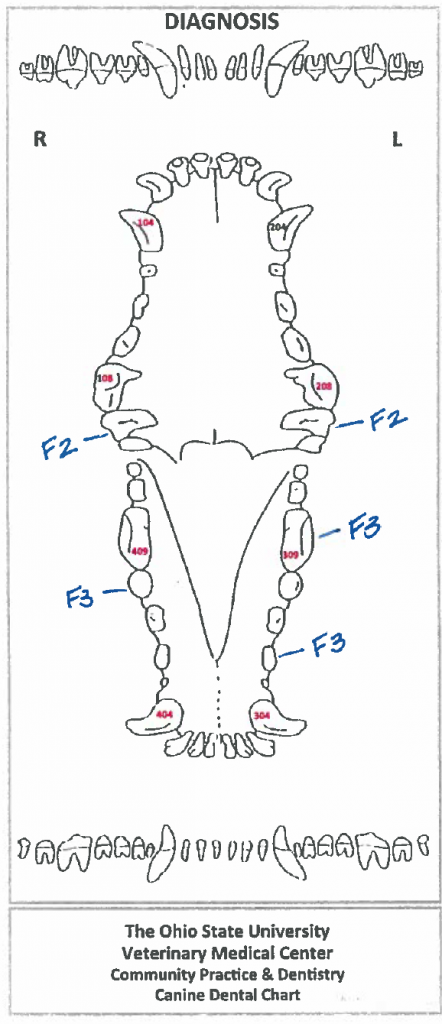
Furcation Exposure: Tooth 109 and 209 have Furcation 2 exposure noted with F2 and Tooth 306, 309 and 408 have Furcation 3 exposure noted with F3. Tooth 109 and 209 when evaluated from the buccal surface can only ever have an F2, never an F3 – do you know why?
Mobility
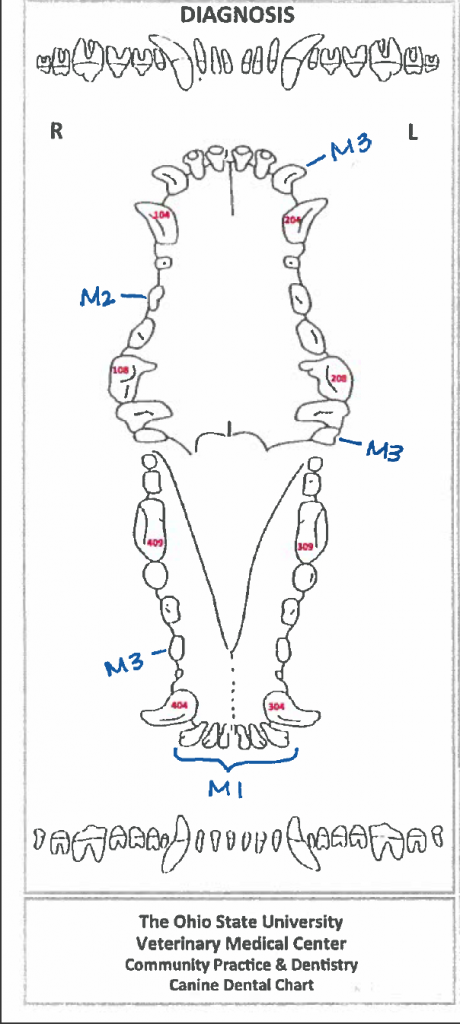
Mobility: Tooth 203, 210, and 406 are severely mobile, so noted with M3. Tooth 106 is moderately mobile, so noted with M2. Tooth 301, 302, 303, 401, 402, 403 have mild mobility and are noted with M1.
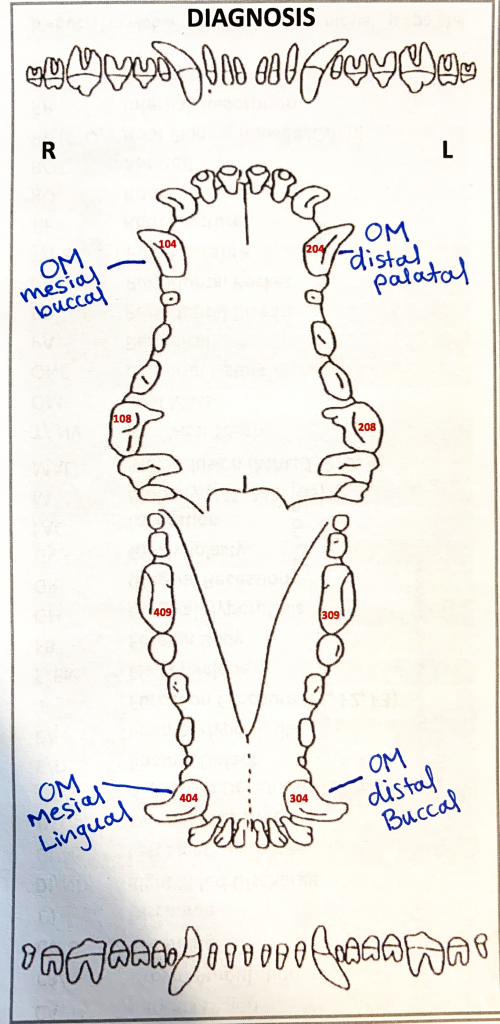
Gingival/Oral Masses
Oral Masses: Four masses were present. Tooth 104 has a gingival mass on the mesial buccal side. It is noted (OM) mesial buccal. The mass on Tooth 204 is located on the distal palatal side. It is noted (OM) distal palatal. Tooth 304 has a gingival mass on the distal buccal side and is noted (OM) distal buccal. The mass on tooth 404 is located on the mesial lingual side and is noted (OM) mesial lingual.
Wrapping Up
In this lesson, you learned how to chart the dental structures in a systematic fashion. You are now ready for the Dental Charting Practical Assessment!
Before Moving On …
OSU Students: In the skills center, you will have additional opportunities to practice dental charting.